2018-12-25 18:40:48 +08:00
|
|
|
|
---
|
2019-02-21 23:34:11 +08:00
|
|
|
|
id: "2018-08-04-10-58"
|
|
|
|
|
|
title: "nat模式虚拟机主机相互ping通"
|
|
|
|
|
|
headWord: "如题。"
|
|
|
|
|
|
tags: ["vmware","nat","ping","ubuntu"]
|
|
|
|
|
|
categories:
|
|
|
|
|
|
- "java"
|
|
|
|
|
|
- "正则匹配"
|
2018-12-25 18:40:48 +08:00
|
|
|
|
---
|
2018-11-10 17:10:02 +08:00
|
|
|
|
|
2019-01-07 10:31:40 +08:00
|
|
|
|
## 1、wmware 设置
|
2018-10-07 17:53:22 +08:00
|
|
|
|
|
2019-01-07 10:31:40 +08:00
|
|
|
|
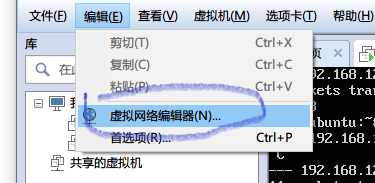
  这篇记录下 nat 网络模式下虚拟机与主机的相互 ping 通。首先使用 wmware 建立一个 ubuntu 虚拟机,网络模式选择 nat 模式。然后点击虚拟网络编辑:
|
2018-10-07 17:53:22 +08:00
|
|
|
|
|
2019-01-07 10:31:40 +08:00
|
|
|
|
|
2018-10-07 17:53:22 +08:00
|
|
|
|
|
2019-01-07 10:31:40 +08:00
|
|
|
|
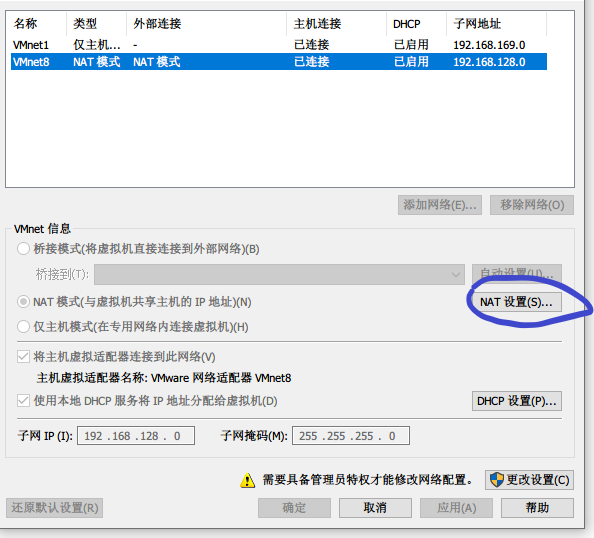
接下来点击 nat 设置:
|
2018-10-07 17:53:22 +08:00
|
|
|
|
|
2019-01-07 10:31:40 +08:00
|
|
|
|
|
2018-10-07 17:53:22 +08:00
|
|
|
|
|
|
|
|
|
|
看到如下:
|
|
|
|
|
|
|
2019-01-07 10:31:40 +08:00
|
|
|
|
|
2018-10-07 17:53:22 +08:00
|
|
|
|
|
2019-01-07 10:31:40 +08:00
|
|
|
|
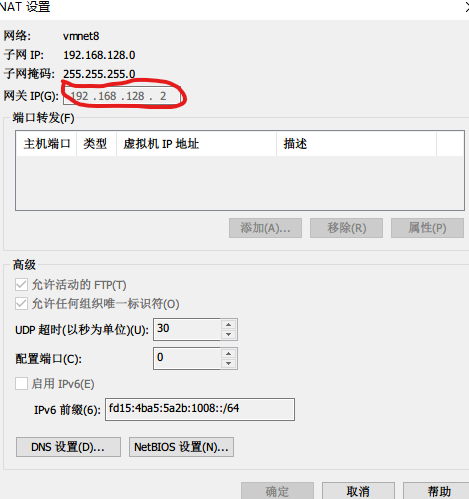
上面红框是关键,记录这个值,下面虚拟机设置静态 ip 要用到。
|
2018-10-07 17:53:22 +08:00
|
|
|
|
|
2019-01-07 10:31:40 +08:00
|
|
|
|
## 2、window 网络设置
|
2018-10-07 17:53:22 +08:00
|
|
|
|
|
2019-01-07 10:31:40 +08:00
|
|
|
|
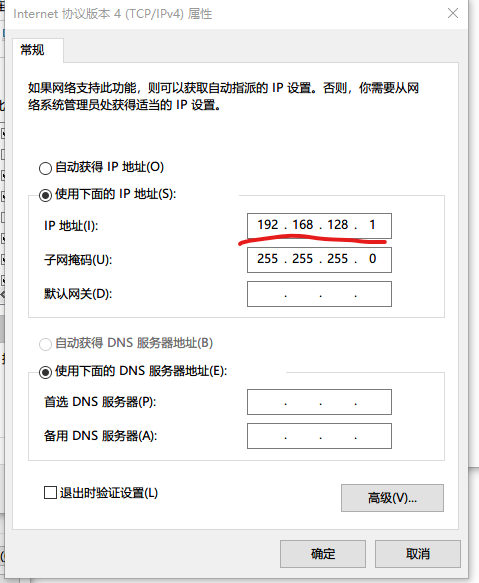
  打开网络适配器页面,选择 VMnet,右键->属性->Internet 协议版本 4(TCP/IPV4)->属性,设置 ip 地址为上面上面网关地址最后一个数改成 1,比如 192.168.128.2 就要设置为 192.168.128.1,同时设置子网掩码为 255.255.255.0,默认网关不要填。我的如下:
|
2018-10-07 17:53:22 +08:00
|
|
|
|
|
2019-01-07 10:31:40 +08:00
|
|
|
|
|
2018-10-07 17:53:22 +08:00
|
|
|
|
|
|
|
|
|
|
**如果想让虚拟机能够访问主机需要关闭主机的防火墙**
|
|
|
|
|
|
|
2019-01-07 10:31:40 +08:00
|
|
|
|
## 3、ubuntu 设置
|
2018-10-07 17:53:22 +08:00
|
|
|
|
|
|
|
|
|
|
  编辑/etc/network/interfaces
|
|
|
|
|
|
|
|
|
|
|
|
```bash
|
|
|
|
|
|
vim /etc/network/interfaces
|
|
|
|
|
|
# This file describes the network interfaces available on your system
|
|
|
|
|
|
# and how to activate them. For more information, see interfaces(5).
|
|
|
|
|
|
|
|
|
|
|
|
source /etc/network/interfaces.d/*
|
|
|
|
|
|
|
|
|
|
|
|
# The loopback network interface
|
|
|
|
|
|
auto lo
|
|
|
|
|
|
iface lo inet loopback
|
|
|
|
|
|
|
|
|
|
|
|
# The primary network interface
|
|
|
|
|
|
auto ens33
|
|
|
|
|
|
# dhcp 改成static,然后设置下面的address,netmask,gateway
|
|
|
|
|
|
iface ens33 inet static
|
|
|
|
|
|
address 192.168.128.129
|
|
|
|
|
|
netmask 255.255.255.0
|
|
|
|
|
|
gateway 192.168.128.2
|
|
|
|
|
|
# 设置dns
|
|
|
|
|
|
dns-nameservers 192.168.128.2
|
|
|
|
|
|
|
|
|
|
|
|
|
|
|
|
|
|
```
|
|
|
|
|
|
|
|
|
|
|
|
然后执行`/etc/init.d/networking restart`,或者重启虚拟机以启用网络设置。
|
|
|
|
|
|
|
|
|
|
|
|
## 3、验证
|
|
|
|
|
|
|
2019-01-07 10:31:40 +08:00
|
|
|
|
  现在虚拟机中`ping 192.168.128.1`可以 ping 通,主机中`ping 192.168.128.129`也可 ping 通。
|