8.9 KiB
8.9 KiB
说明springboot版本2.0.3
##一、 介绍
Spring Security是一个能够为基于Spring的企业应用系统提供声明式的安全访问控制解决方案的安全框架。它提供了一组可以在Spring应用上下文中配置的Bean,充分利用了Spring IoC,DI(控制反转Inversion of Control ,DI:Dependency Injection 依赖注入)和AOP(面向切面编程)功能,为应用系统提供声明式的安全访问控制功能,减少了为企业系统安全控制编写大量重复代码的工作。
##二、 环境搭建
建立springboot2项目,加入security依赖,mybatis依赖
<dependency>
   <groupId>org.springframework.boot</groupId>
   <artifactId>spring-boot-starter-security</artifactId>
</dependency>
<dependency>
   <groupId>org.mybatis.spring.boot</groupId>
   <artifactId>mybatis-spring-boot-starter</artifactId>
   <version>1.3.2</version>
</dependency>
<dependency>
    <groupId>mysql</groupId>
    <artifactId>mysql-connector-java</artifactId>
    <scope>runtime</scope>
</dependency>
数据库为传统的用户--角色--权限,权限表记录了url和method,springboot配置文件如下:
mybatis:
  type-aliases-package: com.example.demo.entity
server:
  port: 8081
spring:
  datasource:
    driver-class-name: com.mysql.jdbc.Driver
    url: jdbc:mysql://localhost:3306/test?useUnicode=true&characterEncoding=utf-8&useSSL=true
    username: root
    password: 123456
  http:
    encoding:
      charset: utf-8
      enabled: true
springboot启动类中加入如下代码,设置路由匹配规则。
@Override
protected void configurePathMatch(PathMatchConfigurer configurer) {
    configurer.setUseSuffixPatternMatch(false) //设置路由是否后缀匹配,譬如/user能够匹配/user.,/user.aa
		.setUseTrailingSlashMatch(false); //设置是否后缀路径匹配,比如/user能够匹配/user,/user/
}
三、 security配置
默认情况下security是无需任何自定义配置就可使用的,我们不考虑这种方式,直接讲如何个性化登录过程。
1、 建立security配置文件,目前配置文件中还没有任何配置。
@Configuration
public class SecurityConfig extends WebSecurityConfigurerAdapter {
}
2、 个性化登录,security中的登录如下:
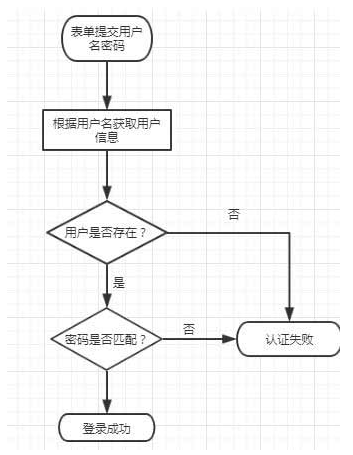
- security需要一个user的实体类实现
UserDetails接口,该实体类最后与系统中用户的实体类分开,代码如下:
public class SecurityUser implements UserDetails{
	private static final long serialVersionUID = 1L;
	private String password;
	private String name;
	List<GrantedAuthority> authorities;

	public User(string name,string password) {
		this.id = id;
		this.password = password;
		this.name = name;
		this.age = age;
	}

	public void setAuthorities(List<GrantedAuthority> authorities) {
		this.authorities = authorities;
	}

	@Override
	public Collection<GrantedAuthority> getAuthorities() {
		return this.authorities;
	}

	@Override //获取校验用户名
	public String getUsername() {
		return String.valueOf(this.id);
	}

    @Override //获取校验用密码
	public String getPassword() {
		return password;
	}

	@Override //账户是否未过期
	public boolean isAccountNonExpired() {
		// TODO Auto-generated method stub
		return true;
	}

	@Override  //账户是否未锁定
	public boolean isAccountNonLocked() {
		// TODO Auto-generated method stub
		return true;
	}

	@Override  //帐户密码是否未过期,一般有的密码要求性高的系统会使用到,比较每隔一段时间就要求用户重置密码
	public boolean isCredentialsNonExpired() {
		// TODO Auto-generated method stub
		return true;
	}

	@Override //账户是否可用
	public boolean isEnabled() {
		// TODO Auto-generated method stub
		return true;
	}
}
- 编写了实体类还需要编写一个服务类SecurityService实现
UserDetailsService接口,重写loadByUsername方法,通过这个方法根据用户名获取用户信息,代码如下:
@Component
public class SecurityUserService implements UserDetailsService {
    @Autowired
    private JurisdictionMapper jurisdictionMapper;
    @Autowired
    private UserMapper userMapper;
    private Logger log = LoggerFactory.getLogger(this.getClass());


    @Override
	public UserDetails loadUserByUsername(String username) throws UsernameNotFoundException {
		log.info("登录用户id为:{}",username);
		int id = Integer.valueOf(username);
		User user = userMapper.getById(id);
		if(user==null) {
            //抛出错误,用户不存在
			throw new UsernameNotFoundException("用户名 "+username+"不存在");
		}
		//获取用户权限
		List<GrantedAuthority> authorities = new ArrayList<>();
		List<Jurisdiction> jurisdictions = jurisdictionMapper.selectByUserId(id);
		for(Jurisdiction item : jurisdictions) {
            GrantedAuthority authority = new MyGrantedAuthority(item.getMethod(),item.getUrl());
			authorities.add(authority);
		}
        SecurityUser securityUser = new SecurityUser(user.getName(),user.getPassword(),authority):
		user.setAuthorities(authorities);
		return securityUser;
	}
}
- 通常我们会对密码进行加密,所有还要编写一个passwordencode类,实现PasswordEncoder接口,代码如下:
@Component
public class MyPasswordEncoder implements PasswordEncoder {
	private Logger log = LoggerFactory.getLogger(this.getClass());

	@Override //不清楚除了在下面方法用到还有什么用处
	public String encode(CharSequence rawPassword) {
		return StringUtil.StringToMD5(rawPassword.toString());
	}

	//判断密码是否匹配
	@Override
	public boolean matches(CharSequence rawPassword, String encodedPassword) {
		return encodedPassword.equals(this.encode(rawPassword));
	}
}
3、 编辑配置文件
- 编写config Bean以使用上面定义的验证逻辑,securityUserService、myPasswordEncoder通过@Autowired引入。
@Override
protected void configure(AuthenticationManagerBuilder auth) throws Exception {
    auth.userDetailsService(securityUserService)
        .passwordEncoder(myPasswordEncoder);
}
- 然后编写configure Bean(和上一个不一样,参数不同),实现security验证逻辑,代码如下:
@Override
	protected void configure(HttpSecurity http) throws Exception {
		http
		.csrf() //跨站
		.disable() //关闭跨站检测
		.authorizeRequests()//验证策略策略链
			.antMatchers("/public/**").permitAll()//无需验证路径
           .antMatchers("/login").permitAll()//放行登录
			.antMatchers(HttpMethod.GET, "/user").hasAuthority("getAllUser")//拥有权限才可访问
			.antMatchers(HttpMethod.GET, "/user").hasAnyAuthority("1","2")//拥有任一权限即可访问
			//角色类似,hasRole(),hasAnyRole()
			.anyRequest().authenticated()
		.and()
		.formLogin()
			.loginPage("/public/unlogin") //未登录跳转页面,设置了authenticationentrypoint后无需设置未登录跳转页面
			.loginProcessingUrl("/public/login")//处理登录post请求接口,无需自己实现
            .successForwardUrl("/success")//登录成功转发接口
            .failureForwardUrl("/failed")//登录失败转发接口
            .usernameParameter("id") //修改用户名的表单name,默认为username
            .passwordParameter("password")//修改密码的表单name,默认为password
		.and()
		.logout()//自定义登出
			.logoutUrl("/public/logout") //自定义登出api,无需自己实现
            .logoutSuccessUrl("public/logoutSuccess")
	}
到这里便可实现security与springboot的基本整合。
四、实现记住我功能
1、 建表
记住我功能需要数据库配合实现,首先要在数据库建一张表用户保存cookie和用户名,数据库建表语句如下:不能做修改
CREATE TABLE `persistent_logins` (
  `username` varchar(64) NOT NULL,
  `series` varchar(64) NOT NULL,
  `token` varchar(64) NOT NULL,
  `last_used` timestamp NOT NULL DEFAULT CURRENT_TIMESTAMP ON UPDATE CURRENT_TIMESTAMP,
  PRIMARY KEY (`series`)
)
2、 编写rememberMeservice Bean
代码如下:
	@Bean
    public RememberMeServices rememberMeServices(){
        JdbcTokenRepositoryImpl jdbcTokenRepository = new JdbcTokenRepositoryImpl();
        jdbcTokenRepository.setDataSource(dataSource);
        PersistentTokenBasedRememberMeServices rememberMeServices =
                new PersistentTokenBasedRememberMeServices("INTERNAL_SECRET_KEY",securityUserService,jdbcTokenRepository);
        //还可设置许多其他属性
       rememberMeServices.setCookieName("kkkkk"); //客户端cookie名
        return rememberMeServices;
    }
dataSource为@Autowired引入
3、 配置文件设置remember
在config(HttpSecurity http)中加入记住我功能
.rememberMe()
    .rememberMeServices(rememberMeServices())
    .key("INTERNAL_SECRET_KEY")
在登录表单中设置remember-me即可实现记住我功能。