---
id: "2018-09-05-10-38"
date: "2018/09/05 10:38:00"
title: "springboot整合ActiveMQ1(基本使用)"
tags: ["java", "spring","springboot","消息队列","activeMQ"]
categories:
- "java"
- "spring boot学习"
---
- 基本使用,[https://www.tapme.top/blog/detail/2018-09-05-10-38](https://www.tapme.top/blog/detail/2018-09-05-10-38)
- 主备模式,[https://www.tapme.top/blog/detail/2018-09-06-10-38](https://www.tapme.top/blog/detail/2018-09-06-10-38)
**说明**:acitveMQ 版本为:5.9.1,springboot 版本为 2.0.3
## 一. 下载安装(windows)
  官方下载地址:[点我跳转](http://activemq.apache.org/download-archives.html),选择 windows 安装包下载,然后解压,解压后运行 bin 目录下的**activemq.bat**启动服务,无报错即可启动成功。默认管理地址为:[localhost:8161/admin](localhost:8161/admin),默认管理员账号密码为**admin**/**admin**。
## 二. springboot 整合
### 1. 创建 springboot 项目
  创建 springboot web 项目,加入 spring-boot-starter-activemq 依赖。
```xml
<dependency>
<groupId>org.springframework.boot</groupId>
<artifactId>spring-boot-starter-activemq</artifactId>
</dependency>
```
  然后编辑配合文件,加上一个配置:61616 为 activeMQ 的默认端口,暂时不做其他配置,使用默认值。
```yml
spring:
activemq:
broker-url: tcp://localhost:61616
```
### 2. 创建生产者消费者
  springboot 中 activeMQ 的默认配置为**生产-消费者模式**,还有一种模式为**发布-订阅模式**后面再讲。项目目录如下:

  首先编写配置类 Config.java,代码如下
```java
@Configuration
public class Config {
@Bean(name = "queue2")
public Queue queue2(){
return new ActiveMQQueue("active.queue2");
}
@Bean(name = "queue1")
public Queue queue1(){
return new ActiveMQQueue("active.queue1");
}
}
```
上面的代码建立了两个消息队列 queue1,queue2,分别由 queue1 和 queue2 这两个 Bean 注入到 Spring 容器中。程序运行后会在 activeMQ 的管理页面->queue 中看到如下:

<!-- more -->
  生产者 Producer.java 代码如下:
```java
@RestController
public class Producer {
@Autowired
private JmsMessagingTemplate jmsMessagingTemplate;
@Autowired()
@Qualifier("queue2")
private Queue queue2;
@Autowired()
@Qualifier("queue1")
private Queue queue1;
@GetMapping("/queue2")
public void sendMessage1(String message){
jmsMessagingTemplate.convertAndSend(queue2,"I'm from queue2:"+message);
}
@GetMapping("/queue1")
public void sendMessage2(String message){
jmsMessagingTemplate.convertAndSend(queue1,"I'm from queue1:"+message);
}
}
```
上面的类创建了两个 GET 接口,访问这两个接口分别向 queue1 和 queue2 中发送消息。
消费者 Comsumer.java 代码如下:
```java
@Component //将该类注解到Spring 容器中
public class Comsumer {
//接受消息队列1消息
@JmsListener(destination = "active.queue1") //监听active.queue1消息队列
public void readActiveQueue11(String message){
System.out.println(1+message);
}
//接受消息队列1消息
@JmsListener(destination = "active.queue1")
public void readActiveQueue12(String message){
System.out.println(2+message);
}
//接受消息队列2消息
@JmsListener(destination = "active.queue2")
public void readActiveQueue21(String message){
System.out.println(1+message);
}
//接受消息队列2消息
@JmsListener(destination = "active.queue2")
public void readActiveQueue22(String message){
System.out.println(2+message);
}
}
```
上面的代码定义了 4 个消费者,每两个消费一个消息队列。
### 3. 运行
  启动项目后分别向/queue1?message=niihao,/queue2?message=nihaoa 发送 http 请求,然后我们可以在控制台中看到如下输出:
```
2I'm from queue2:nihaoa
1I'm from queue2:nihaoa
2I'm from queue1:nihao
1I'm from queue1:nihao
```
消息都成功被消费者消费,从打印结果也可看出生产者消费者的一个特点:一个消息只会被一个消费者消费。同时在管理页面中可以看到:
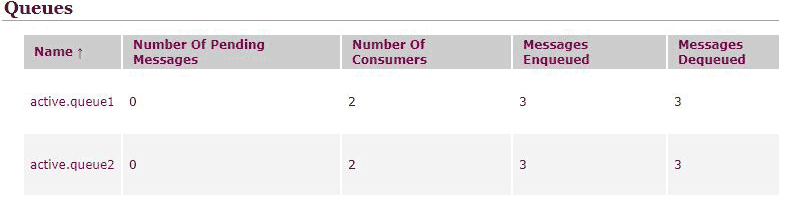
每个消息队列有两个消费者,队列进入了三个消息,出了三个消息,说明消息都被消费掉了,如果注释掉消费者代码,再次运行,然后发送消息就会发现 MessagesEnqueued 数量大于 MessagesDequeued,然后再让消费者上线会立即消费掉队列中的消息。
**本文原创发布于:**[https://www.tapme.top/blog/detail/2018-09-05-10-38](https://www.tapme.top/blog/detail/2018-09-05-10-38)
源码:[https://github.com/FleyX/demo-project/tree/master/jms_demo](https://github.com/FleyX/demo-project/tree/master/jms_demo)