291 lines
9.4 KiB
Markdown
291 lines
9.4 KiB
Markdown
---
|
||
id: "2018-11-19-15-57-00"
|
||
date: "2018/11/19 15:57:00"
|
||
title: "springCloud学习1(集中式配置管理)"
|
||
tags: ["spring-boot", "spring-cloud-config","git"]
|
||
categories:
|
||
- "java"
|
||
- "springCloud实战"
|
||
---
|
||
|
||
  本篇项目代码存放于:[点击跳转](https://github.com/FleyX/demo-project/tree/master/springcloud/spring-cloud-config%E9%85%8D%E7%BD%AE%E4%B8%AD%E5%BF%83)
|
||
|
||
## 一、前言
|
||
|
||
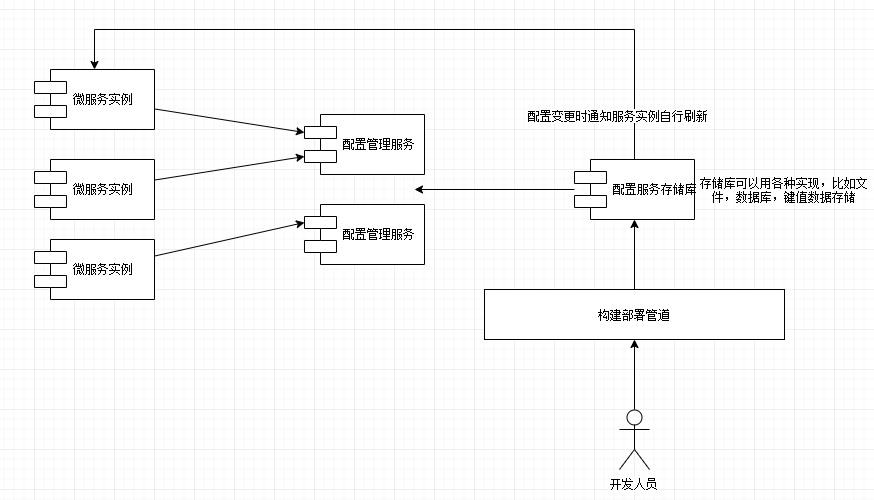
  在开发普通的 web 应用中,我们通常是将配置项写在单独的配置文件中,比如`application.yml`,`application.properties`,但是在微服务架构中,可能会出现数百个微服务,如果每个微服务将配置文件写在自身的配置文件中,会导致配置文件的管理非常复杂。因此集中式的配置管理是非常有必要的,每个服务启动时从集中式的存储库中读取需要的配置信息。其模型如下:
|
||
|
||
|
||
|
||
简单来说就是如下几点:
|
||
|
||
1. 启动一个微服务实例时向配置管理服务请求获取其所在环境的特定配置文件
|
||
2. 实际的配置信息驻留在存储库中。可以选择不同的实现来保存配置数据,包含:源代码控制下的文件、关系数据库或键值数据存储
|
||
3. 应用程序配置数据的实际管理和应用程序无关。配置的更改通常通过构建和部署管道来处理
|
||
4. 进行配置管理更改时,必须通知使用该配置的服务实例
|
||
|
||
  由于本系列为 spring cloud,所以使用`Spring Cloud Config`来构建配置管理,当然还有很多其他优秀的解决方案(Etcd,Eureka,Consul...)。
|
||
|
||
## 二、构建配置服务
|
||
|
||
  spring cloud 是建立在 spring boot 的基础上的,因此需要有 spring boot 的构建基础。
|
||
|
||
### 1、pom 编写
|
||
|
||
  pom 主要依赖如下(篇幅原因列出主要内容,完整代码请到 github 上查看),spring boot 版本和 spring cloud 版本如下,之后不在赘述:
|
||
|
||
<!-- more -->
|
||
|
||
```xml
|
||
<parent>
|
||
<groupId>org.springframework.boot</groupId>
|
||
<artifactId>spring-boot-starter-parent</artifactId>
|
||
<version>1.4.4.RELEASE</version>
|
||
</parent>
|
||
|
||
<dependencyManagement>
|
||
<dependencies>
|
||
<dependency>
|
||
<groupId>org.springframework.cloud</groupId>
|
||
<artifactId>spring-cloud-dependencies</artifactId>
|
||
<version>Camden.SR5</version>
|
||
<type>pom</type>
|
||
<scope>import</scope>
|
||
</dependency>
|
||
</dependencies>
|
||
</dependencyManagement>
|
||
|
||
<properties>
|
||
<project.build.sourceEncoding>UTF-8</project.build.sourceEncoding>
|
||
<project.reporting.outputEncoding>UTF-8</project.reporting.outputEncoding>
|
||
<java.version>1.8</java.version>
|
||
<spring-cloud.version>Camden.SR5</spring-cloud.version>
|
||
</properties>
|
||
|
||
<dependencies>
|
||
<dependency>
|
||
<groupId>org.springframework.cloud</groupId>
|
||
<artifactId>spring-cloud-config-server</artifactId>
|
||
</dependency>
|
||
<dependency>
|
||
<groupId>org.springframework.cloud</groupId>
|
||
<artifactId>spring-cloud-starter-config</artifactId>
|
||
</dependency>
|
||
|
||
<dependency>
|
||
<groupId>org.springframework.boot</groupId>
|
||
<artifactId>spring-boot-starter-test</artifactId>
|
||
<scope>test</scope>
|
||
</dependency>
|
||
</dependencies>
|
||
```
|
||
|
||
### 2、注解引导类
|
||
|
||
  只需在 spring boot 启动类上加入一个`@EnableConfigServer`注解即可。
|
||
|
||
### 3、配置服务配置编写(使用文件存储)
|
||
|
||
  这里是给**配置服务**使用的配置文件,用于声明端口,存储库类别等信息,并不是给其他微服务使用的配置。配置如下(使用文件存储配置信息):
|
||
|
||
```yaml
|
||
server:
|
||
port: 8888
|
||
spring:
|
||
profiles:
|
||
# 使用文件系统来存储配置信息,需要设置为native
|
||
active: native
|
||
cloud:
|
||
config:
|
||
server:
|
||
native:
|
||
# 使用文件来存放配置文件,为每个应用程序提供用逗号分隔的文件夹列表
|
||
searchLocations: file:///D:/configFolder/licensingservice
|
||
```
|
||
|
||
### 4、创建供应用程序使用的配置文件
|
||
|
||
  通过上面的`searchLocations`可知目前有一个名为 licensingservice 的应用程序,在对应目录下创建如下三个配置文件:
|
||
|
||
- licensingservice.yml
|
||
|
||
```yaml
|
||
server:
|
||
port: 10010
|
||
spring:
|
||
application:
|
||
name: licensingservice
|
||
```
|
||
|
||
- licensingservice-dev.yml
|
||
|
||
```yaml
|
||
server:
|
||
port: 10011
|
||
```
|
||
|
||
- licensingservice-prod.yml
|
||
|
||
```yaml
|
||
server:
|
||
port: 10012
|
||
```
|
||
|
||
配置文件命名约定为:`应用程序名称-环境名称.yml`。现在启动应用便能通过 http 请求来获取配置了。
|
||
|
||
  请求[localhost:8888/licensingservice/default](localhost:8888/licensingservice/default),返回结果如下:
|
||
|
||
```json
|
||
{
|
||
"name": "licensingservice",
|
||
"profiles": ["default"],
|
||
"label": null,
|
||
"version": null,
|
||
"state": null,
|
||
"propertySources": [
|
||
{
|
||
"name": "file:///D:/configFolder/licensingservice/licensingservice.yml",
|
||
"source": {
|
||
"server.port": 10001,
|
||
"spring.application.name": "licensingservice"
|
||
}
|
||
}
|
||
]
|
||
}
|
||
```
|
||
|
||
  请求[localhost:8888/licensingservice/dev](localhost:8888/licensingservice/dev),返回结果如下:
|
||
|
||
```json
|
||
{
|
||
"name": "licensingservice",
|
||
"profiles": ["dev"],
|
||
"label": null,
|
||
"version": null,
|
||
"state": null,
|
||
"propertySources": [
|
||
{
|
||
"name": "file:///D:/configFolder/licensingservice/licensingservice-dev.yml",
|
||
"source": {
|
||
"server.port": 10011
|
||
}
|
||
},
|
||
{
|
||
"name": "file:///D:/configFolder/licensingservice/licensingservice.yml",
|
||
"source": {
|
||
"server.port": 10001,
|
||
"spring.application.name": "licensingservice"
|
||
}
|
||
}
|
||
]
|
||
}
|
||
```
|
||
|
||
## 二、和 spring boot 客户端集成
|
||
|
||
  上面写了如何使用 spring cloud config 构建配置服务,这一节来构建 licensingserivce 服务,使用上面的配置服务来获取配置文件。
|
||
|
||
### 1、创建 springboot 工程
|
||
|
||
  创建 springboot 项目 licensingservice,主要依赖如下:
|
||
|
||
```xml
|
||
<dependency>
|
||
<groupId>org.springframework.boot</groupId>
|
||
<artifactId>spring-boot-starter-web</artifactId>
|
||
</dependency>
|
||
<dependency>
|
||
<groupId>org.springframework.cloud</groupId>
|
||
<artifactId>spring-cloud-config-client</artifactId>
|
||
</dependency>
|
||
```
|
||
|
||
### 2、编写配置文件
|
||
|
||
  共两个配置文件,`application.yml`,`bootstrap.yml`
|
||
|
||
- application.yml
|
||
|
||
本配置文件用于存放留在本地配置信息,如果存在同名配置,本地的会被覆盖,不会生效
|
||
|
||
```yaml
|
||
server:
|
||
port: 10099
|
||
```
|
||
|
||
- bootstrap.yml
|
||
|
||
给 spring cloud config client 读取的配置文件,根据该配置向配置中心请求
|
||
|
||
```yaml
|
||
spring:
|
||
application:
|
||
#指定名称,以便spring cloud config客户端知道查找哪个配置
|
||
name: licensingservice
|
||
profiles:
|
||
#指定环境(default,dev,prod)
|
||
active: dev
|
||
cloud:
|
||
config:
|
||
#指定config server地址
|
||
uri: http://localhost:8888
|
||
```
|
||
|
||
PS:如果想要覆盖 bootstrap.yml 的配置可在启动命令加上-d 参数,如:
|
||
|
||
`java -Dsptring.cloud.config.uri=.... -Dspring.profiles.active=prod xxxxx.jar`
|
||
|
||
### 3、启动
|
||
|
||
  启动 licensingservice 可以发现启动端口为 10011,说明远程读取配置生效了。
|
||
|
||
## 三、使用 git 作为配置服务的数据源
|
||
|
||
### 1、创建源配置文件
|
||
|
||
  在 github 某个仓库下创建配置文件,比如在[https://github.com/FleyX/demo-project](https://github.com/FleyX/demo-project)仓库下的**springcloud/config**目录下创建 licengingservice 服务的配置文件。
|
||
|
||
### 2、修改 config server 配置文件
|
||
|
||
  修改 confsvr 中的 application.yml
|
||
|
||
```yaml
|
||
server:
|
||
port: 8888
|
||
spring:
|
||
profiles:
|
||
# 使用文件系统来存储配置信息,需要设置为native,git设置为git
|
||
active: git
|
||
application:
|
||
name: test
|
||
cloud:
|
||
config:
|
||
server:
|
||
native:
|
||
# 使用文件来存放配置文件,为每个应用程序提供用逗号分隔的文件夹列表
|
||
searchLocations: file:///D:/configFolder/licensingservice
|
||
git:
|
||
uri: https://github.com/FleyX/demo-project
|
||
# 查找配置文件路径(,分隔)
|
||
search-paths: springcloud/config/licensingservice
|
||
#如果为公开仓库,用户名密码可不填写
|
||
username:
|
||
password:
|
||
#配置git仓库的分支
|
||
label: master
|
||
```
|
||
|
||
### 3、启动
|
||
|
||
  重新启动,即可发现配置成功生效。
|
||
|
||
## 四、配置刷新
|
||
|
||
  使用 spring cloud 配置服务器时,有一个问题是如何在属性变化时动态刷新应用程序。spring cloud 配置服务始终提供最新版本的属性,对低层存储库属性的更改将会是最新的。但是 config client 并不会知道配置的变更,因此不会自动刷新属性。
|
||
|
||
  Spring Boot Actuator 提供了一个`@RefreshScope`属性来重新读取应用程序配置信息,开发人员可通过`/refresh`进行刷新。该注释需要注释在启动入口类上。注意:**只会加载自定义 Spring 属性,例如数据库,端口等配置不会重新加载**。
|
||
|
||
## 总结
|
||
|
||
  本篇只是用到了 spring-cloud-config 这个来进行配置集中管理,并没有涉及到微服务,在下一篇将开始微服务的学习。
|
||
  本篇两个项目代码存放于:[点击跳转](https://github.com/FleyX/demo-project/tree/master/springcloud/spring-cloud-config%E9%85%8D%E7%BD%AE%E4%B8%AD%E5%BF%83)
|