405 lines
12 KiB
Markdown
405 lines
12 KiB
Markdown
---
|
||
id: "2019-04-05"
|
||
date: "2019/04/25 10:58"
|
||
title: "最新ubuntu搭建公网个人邮件服务器(基于postfix,dovecot,mysql)"
|
||
tags: ["smtp", "linux", "ubuntu", "邮件服务器", "postfix", "dovecot"]
|
||
|
||
categories:
|
||
- "搭建服务"
|
||
---
|
||
|
||
  最近做了一个应用,需要用邮件发通知,但是免费的邮箱每天发信数量是有限制的,所以呢就想着搭建一个自己的邮件服务器,能够实现邮件的发送和接收即可,其中大概花了一个星期找资料,测试,终于成功了,写个教程分享给大家。
|
||
|
||
  本教程基于 ubuntu 18.04(其他的 linux 理论上也是可以的,只是安装的软件包不一样)。用到的主要软件为:postfix,dovecot,mysql.废话不多说,下面是教程:
|
||
|
||
<!-- more -->
|
||
|
||
# 前置条件
|
||
|
||
- mysql 数据库。本教程中使用 mysql 存储域名,用户信息等。
|
||
- 域名。需要有域名才能实现向公网发邮件/收邮件。这里以 test.com 为例。
|
||
- ssl 证书。有不少免费的 ssl 证书提供商,或者使用自签证书,百度即可。
|
||
|
||
# 安装环境
|
||
|
||
## 安装软件
|
||
|
||
  切换到 root 用户下,执行以下命令:
|
||
|
||
```bash
|
||
apt update
|
||
apt install postfix postfix-mysql dovecot-core dovecot-pop3d dovecot-imapd dovecot-lmtpd dovecot-mysql
|
||
```
|
||
|
||
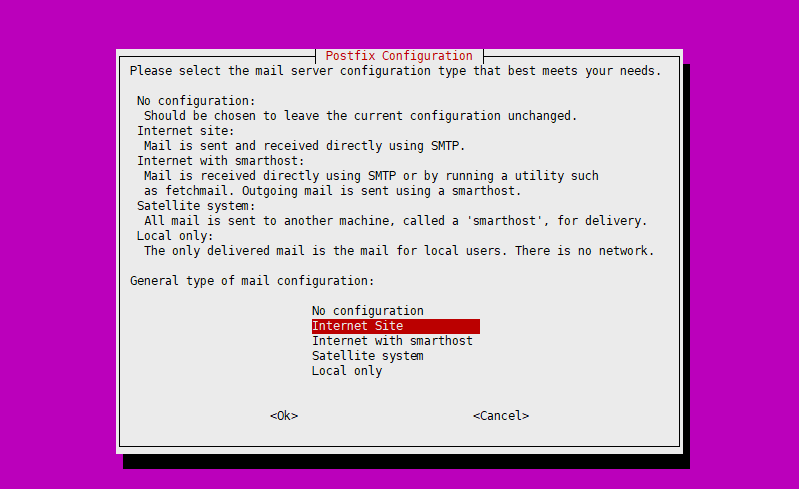
安装过程中 postfix 会弹出提示:
|
||
|
||
|
||
|
||
这里我们选择第二项:Internet Site。
|
||
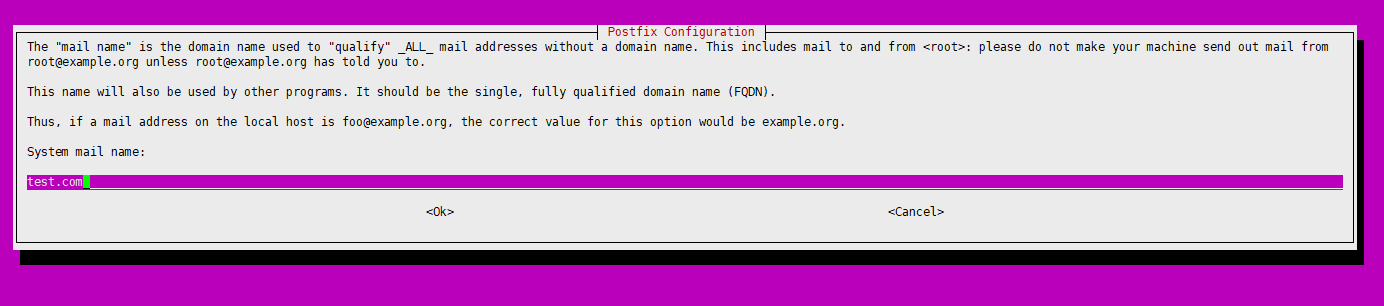
接着会有如下提示:
|
||
|
||
|
||
|
||
这里填入:`test.com`
|
||
|
||
## 配置 mx 解析
|
||
|
||
  在域名提供商增加以下解析:
|
||
|
||
- MX 记录:`test.com` 指向 `服务器IP`
|
||
- A 记录:`pop3.test.com` 指向 `服务器IP`
|
||
- A 记录:`smtp.test.com` 指向 `服务器IP`
|
||
|
||
## 创建 mysql 数据库
|
||
|
||
  新建一个数据库 mailserver,管理账号为:admin/123456
|
||
|
||
  创建虚拟域表,作为认证域。该表是邮件服务器用以接收邮件的域名:
|
||
|
||
```sql
|
||
-- 建立表
|
||
CREATE TABLE `virtual_domains` (
|
||
`id` INT NOT NULL AUTO_INCREMENT,
|
||
`name` VARCHAR(50) NOT NULL,
|
||
PRIMARY KEY (`id`)
|
||
) ENGINE=InnoDB DEFAULT CHARSET=utf8;
|
||
|
||
-- 插入一条记录
|
||
insert into virtual_domains values(1,'test.com')
|
||
```
|
||
|
||
  创建用户表,用于用户身份认证。
|
||
|
||
```sql
|
||
-- 创建用户表
|
||
CREATE TABLE `virtual_users` (
|
||
`id` INT NOT NULL AUTO_INCREMENT,
|
||
`domain_id` INT NOT NULL,
|
||
`password` VARCHAR(106) NOT NULL,
|
||
`email` VARCHAR(120) NOT NULL,
|
||
PRIMARY KEY (`id`),
|
||
UNIQUE KEY `email` (`email`),
|
||
FOREIGN KEY (domain_id) REFERENCES virtual_domains(id) ON DELETE CASCADE
|
||
) ENGINE=InnoDB DEFAULT CHARSET=utf8;
|
||
|
||
-- 插入两个用户,以md5加密密码,实际应用中应该选择强度更高的算法,md5目前以及不安全了
|
||
insert into virtual_users values(1,1,md5('123456'),'first@test.com');
|
||
insert into virtual_users values(2,1,md5('123456'),'second@test.com');
|
||
```
|
||
|
||
  创建别名表.该表作用相当于当 source 收到邮件时,该邮件会自动转发到 destination 上。
|
||
|
||
```sql
|
||
-- 创建表
|
||
CREATE TABLE `virtual_aliases` (
|
||
`id` int(11) NOT NULL auto_increment,
|
||
`domain_id` int(11) NOT NULL,
|
||
`source` varchar(100) NOT NULL,
|
||
`destination` varchar(100) NOT NULL,
|
||
PRIMARY KEY (`id`),
|
||
FOREIGN KEY (domain_id) REFERENCES virtual_domains(id) ON DELETE CASCADE)
|
||
ENGINE=InnoDB DEFAULT CHARSET=utf8;
|
||
|
||
-- 插入数据,所有发给first的邮件都会自动转发给second
|
||
insert into virtual_aliases values(1,1,'first@test.com','second@test.com')
|
||
|
||
```
|
||
|
||
## 生成 ssl 证书
|
||
|
||
  生成 ssl 证书可参考这一篇[https://www.jianshu.com/p/b47d862bceeb](https://www.jianshu.com/p/b47d862bceeb).为 test.com 生成 ssl 证书,**假设**证书存放地址为:
|
||
|
||
- 公钥 /etc/letsencrypt/live/test.com/fullchain.pem;
|
||
- 私钥 /etc/letsencrypt/live/test.com/privkey.pem;
|
||
|
||
# 配置 postfix
|
||
|
||
  首选备份 postfix 的默认配置文件,然后编辑`main.cf`
|
||
|
||
```bash
|
||
cp /etc/postfix/main.cf /etc/postfix/main.cf.bak
|
||
vim /etc/postfix/main.cf
|
||
```
|
||
|
||
  注释下面的配置:
|
||

|
||
|
||
然后加入如下的配置:
|
||
|
||
```properties
|
||
# 使用自己的ssl证书
|
||
smtpd_tls_cert_file=/etc/letsencrypt/live/test.com/fullchain.pem
|
||
smtpd_tls_key_file=/etc/letsencrypt/live/test.com/privkey.pem
|
||
smtpd_use_tls=yes
|
||
smtpd_tls_auth_only = yes
|
||
# 使用dovecot来做身份认证
|
||
smtpd_sasl_type = dovecot
|
||
smtpd_sasl_path = private/auth
|
||
smtpd_sasl_auth_enable = yes
|
||
smtpd_recipient_restrictions = permit_sasl_authenticated,permit_mynetworks,reject_unauth_destination
|
||
```
|
||
|
||
修改 myhostname,myorigin 为如下的值:
|
||
|
||
```properties
|
||
myhostname = test.com
|
||
myorigin = $myhostname
|
||
```
|
||
|
||
修改 mydestination 值为 localhost,以启动 mysql 中的虚拟域。:
|
||
|
||
```properties
|
||
mydestination = localhost
|
||
```
|
||
|
||
在配置文件的最后加入以下行,确保将邮件投递给 mysql 表中列出的虚拟域。
|
||
|
||
```properties
|
||
virtual_transport = lmtp:unix:private/dovecot-lmtp
|
||
```
|
||
|
||
最后加入以下三项参数,告知 Postfix 配置虚拟域、用户和别名
|
||
|
||
```properties
|
||
virtual_mailbox_domains = mysql:/etc/postfix/mysql-virtual-mailbox-domains.cf
|
||
virtual_mailbox_maps = mysql:/etc/postfix/mysql-virtual-mailbox-maps.cf
|
||
virtual_alias_maps = mysql:/etc/postfix/mysql-virtual-alias-maps.cf
|
||
```
|
||
|
||
  接下来创建上面最后加入的三项参数对应的文件。
|
||
|
||
  创建`/etc/postfix/mysql-virtual-mailbox-domains.cf`,内容如下:
|
||
|
||
```properties
|
||
user = admin
|
||
password = 123456
|
||
port = 3306
|
||
hosts = 127.0.0.1
|
||
dbname = mailserver
|
||
query = SELECT 1 FROM virtual_domains WHERE name='%s'
|
||
```
|
||
|
||
接着重启 postfix,并测试 postfix 能否找到域,如果成功返回 1:
|
||
|
||
```bash
|
||
service postfix restart
|
||
postmap -q test.com mysql:/etc/postfix/mysql-virtual-mailbox-domains.cf
|
||
```
|
||
|
||
  创建`/etc/postfix/mysql-virtual-mailbox-maps.cf`,内容如下:
|
||
|
||
```properties
|
||
user = admin
|
||
password = 123456
|
||
port = 3306
|
||
hosts = 127.0.0.1
|
||
dbname = mailserver
|
||
query = SELECT 1 FROM virtual_users WHERE email='%s'
|
||
```
|
||
|
||
接着重启 postfix,并测试其能否找到邮箱地址,成功返回 1:
|
||
|
||
```shell
|
||
service postfix restart
|
||
postmap -q first@test.com mysql:/etc/postfix/mysql-virtual-mailbox-maps.cf
|
||
```
|
||
|
||
  最后创建`/etc/postfix/mysql-virtual-alias-maps.cf`,内容如下:
|
||
|
||
```properties
|
||
user = admin
|
||
password = 123456
|
||
port = 3306
|
||
hosts = 127.0.0.1
|
||
dbname = mailserver
|
||
query = SELECT destination FROM virtual_aliases WHERE source='%s'
|
||
```
|
||
|
||
同样重启 postfix,验证能否正确找到别名,并返回:
|
||
|
||
```bash
|
||
service postfix restart
|
||
postmap -q first@test.com mysql:/etc/postfix/mysql-virtual-mailbox-maps.cf
|
||
```
|
||
|
||
  如果响应使用 587 端口来进行俺的 smtp 通信,需修改/etc/postfix/master.cf 文件:
|
||
取消以下行的注释:
|
||
|
||
|
||
# 配置 dovecot
|
||
|
||
  postfix 配置完毕,现在来配置 dovecot,首先编辑主配置文件`/etc/dovecot/dovecot.conf`:
|
||
|
||
首先确保下面一行是启用的:
|
||
|
||
```conf
|
||
!include conf.d/*.conf
|
||
```
|
||
|
||
然后在配置文件的最后加入如下配置,启用各协议:
|
||
|
||
```
|
||
protocols = imap lmtp pop3
|
||
```
|
||
|
||
  修改`/etc/dovecot/conf.d/10-mail.conf`,确保存在以下两个配置:
|
||
|
||
```properties
|
||
mail_location = maildir:/var/mail/vhosts/%d/%n
|
||
mail_privileged_group = mail
|
||
```
|
||
|
||
上面的配置将邮件存放目录设置在/var/mail 中,因此将该文件夹的所属人改为 vmail/vmail.命令如下:
|
||
|
||
```bash
|
||
groupadd -g 5000 vmail
|
||
useradd -g vmail -u 5000 vmail -d /var/mail
|
||
chown -R vmail:vmail /var/mail
|
||
```
|
||
|
||
  修改`/etc/dovecot/conf.d/10-auth.conf`。首先确保如下两个配置存在且值正确:
|
||
|
||
```properties
|
||
disable_plaintext_auth = yes
|
||
auth_mechanisms = plain login
|
||
```
|
||
|
||
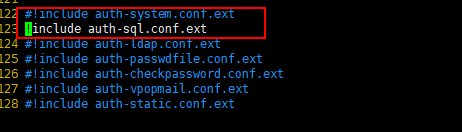
然后修改配置以禁用系统用户登陆,并开启 mysql 支持,如下图所示:
|
||
|
||
|
||
  修改`/etc/dovecot/dovecot-sql.conf.ext`文件,将内容改成下面的内容:
|
||
|
||
```ext
|
||
passdb {
|
||
driver = sql
|
||
args = /etc/dovecot/dovecot-sql.conf.ext
|
||
}
|
||
userdb {
|
||
driver = static
|
||
args = uid=vmail gid=vmail home=/var/mail/vhosts/%d/%n
|
||
}
|
||
```
|
||
|
||
  修改`/etc/dovecot/dovecot-sql.conf.ext`:
|
||
首选取消 driver 参数注释并设置为 mysql
|
||
|
||
```properties
|
||
driver = mysql
|
||
```
|
||
|
||
然后取消 connect 行注释并设置为如下内容:
|
||
|
||
```properties
|
||
connect = host=127.0.0.1 port=3306 dbname=mailserver user=admin password=123456
|
||
```
|
||
|
||
接着取消 default_pass_scheme 行的注释并改为 MD5
|
||
|
||
```properties
|
||
default_pass_scheme = MD5
|
||
```
|
||
|
||
接着取消 password_query 行的注释并设置为以下信息:
|
||
|
||
```properties
|
||
password_query = SELECT email as user, password FROM virtual_users WHERE email='%u';
|
||
```
|
||
|
||
最后将`/etc/dovecot`的拥有者改为 vmail:dovecot
|
||
|
||
```bash
|
||
chown -R vmail:dovecot /etc/dovecot
|
||
chmod -R o-rwx /etc/dovecot
|
||
```
|
||
|
||
  修改`/etc/dovecot/conf.d/10-master.conf`:
|
||
|
||
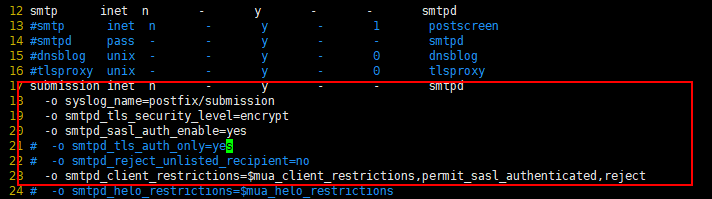
首先将 imap-login , pop3-login 下第一个的 port 设置为 0,以禁用非 ssl 加密的 imap 和 pop3 协议,如下图所示:
|
||
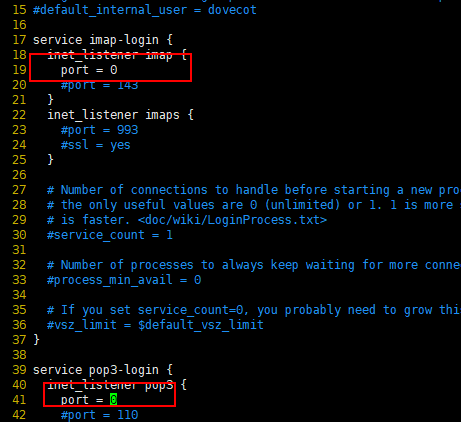
|
||
|
||
然后找到`service lmtp`将其修改为如下:
|
||
|
||
```
|
||
service lmtp {
|
||
unix_listener /var/spool/postfix/private/dovecot-lmtp {
|
||
mode = 0600
|
||
user = postfix
|
||
group = postfix
|
||
}
|
||
|
||
# Create inet listener only if you can't use the above UNIX socket
|
||
#inet_listener lmtp {
|
||
# Avoid making LMTP visible for the entire internet
|
||
#address =
|
||
#port =
|
||
#}
|
||
}
|
||
```
|
||
|
||
然后找到`service auth`将其内容修改为如下:
|
||
|
||
```
|
||
service auth {
|
||
unix_listener /var/spool/postfix/private/auth {
|
||
mode = 0666
|
||
user = postfix
|
||
group = postfix
|
||
}
|
||
|
||
unix_listener auth-userdb {
|
||
mode = 0600
|
||
user = vmail
|
||
#group =
|
||
}
|
||
|
||
user = dovecot
|
||
}
|
||
|
||
```
|
||
|
||
最后找到`service auth-worker`改为如下内容:
|
||
|
||
```
|
||
service auth-worker {
|
||
# Auth worker process is run as root by default, so that it can access
|
||
# /etc/shadow. If this isn't necessary, the user should be changed to
|
||
# $default_internal_user.
|
||
user = vmail
|
||
}
|
||
```
|
||
|
||
  最后要改的就是`/etc/dovecot/conf.d/10-ssl.conf`,以开启 ssl 认证.
|
||
|
||
首先将 ssl 参数改为 required:
|
||
|
||
```properties
|
||
ssl = required
|
||
```
|
||
|
||
然后设置 ssl 证书路径就 ok 了,还是用之前的 ssl 证书:
|
||
|
||
```properties
|
||
ssl_cert = </etc/letsencrypt/live/test.com/fullchain.pem
|
||
ssl_key = </etc/letsencrypt/live/test.com/privkey.pem
|
||
```
|
||
|
||
  到这里所有的配置都 OK,重启 postfix,dovecot 后就可以用邮箱客户端(比如 foxmail)连接了。
|
||
|
||
```
|
||
service postfix restart
|
||
service dovecot restart
|
||
```
|
||
|
||
# 结束
|
||
|
||
  配合一个邮件客户端看似很简单,实际上还是有很多坑的,看看上面那么多的配置项就知道了,一定要耐心。
|
||
|
||
  如果无法登陆,可以看看 postfix 和 dovecot 的日志报错情况,再去修改。日志位置在`/var/log`
|
||
|
||
**注意**:
|
||
被这个问题困扰了好几天,未找到解决办法,最后放弃.
|
||
|
||
  目前很多主机厂商都不支持和其他服务器的 25 端口通信,已知的有(谷歌云,阿里云),这样就导致在这些机器上搭建的 postfix 邮件服务器,无法向其他的外网邮箱发送邮件,因为无法和其他 smtp 服务器的 25 端口建立连接。貌似是为了避免有人恶意搭建邮件服务器向其他的邮件服务器发送大量的垃圾邮件,从而导致此服务器 IP 被反垃圾邮件组织列入 SML。
|
||
|
||
**本博客原创发布于:**[http://tapme.top/blog/detail/2019-04-05](http://tapme.top/blog/detail/2019-04-05)
|