367 lines
11 KiB
Markdown
367 lines
11 KiB
Markdown
---
|
||
id: "2018-09-01-10-38"
|
||
date: "2018/09/01 10:38:00"
|
||
title: "springboot整合Mybatis(xml和注解)"
|
||
tag: ["java", "spring", "springboot", "mysql", "mybatis", "xml", "注解"]
|
||
categories:
|
||
- "java"
|
||
- "spring boot学习"
|
||
---
|
||
|
||
  刚毕业的第一份工作是 java 开发,项目中需要用到 mybatis,特此记录学习过程,这只是一个简单 demo,mybatis 用法很多不可能全部写出来,有更复杂的需求建议查看 mybatis 的官方中文文档,[点击跳转](http://www.mybatis.org/mybatis-3/zh/index.html)。下面时项目环境/版本。
|
||
|
||
- 开发工具:IDEA
|
||
- jdk 版本:1.8
|
||
- springboot 版本:2.03
|
||
|
||
其他依赖版本见下面 pom.xml:
|
||
|
||
<!-- more -->
|
||
|
||
```xml
|
||
<?xml version="1.0" encoding="UTF-8"?>
|
||
<project xmlns="http://maven.apache.org/POM/4.0.0" xmlns:xsi="http://www.w3.org/2001/XMLSchema-instance"
|
||
xsi:schemaLocation="http://maven.apache.org/POM/4.0.0 http://maven.apache.org/xsd/maven-4.0.0.xsd">
|
||
<modelVersion>4.0.0</modelVersion>
|
||
|
||
<groupId>com.example</groupId>
|
||
<artifactId>mybatis-test</artifactId>
|
||
<version>0.0.1-SNAPSHOT</version>
|
||
<packaging>jar</packaging>
|
||
|
||
<name>mybatis-test</name>
|
||
<description>Demo project for Spring Boot</description>
|
||
|
||
<parent>
|
||
<groupId>org.springframework.boot</groupId>
|
||
<artifactId>spring-boot-starter-parent</artifactId>
|
||
<version>2.0.3.RELEASE</version>
|
||
<relativePath/> <!-- lookup parent from repository -->
|
||
</parent>
|
||
|
||
<properties>
|
||
<project.build.sourceEncoding>UTF-8</project.build.sourceEncoding>
|
||
<project.reporting.outputEncoding>UTF-8</project.reporting.outputEncoding>
|
||
<java.version>1.8</java.version>
|
||
</properties>
|
||
|
||
<dependencies>
|
||
<dependency>
|
||
<groupId>org.springframework.boot</groupId>
|
||
<artifactId>spring-boot-starter-web</artifactId>
|
||
</dependency>
|
||
<dependency>
|
||
<groupId>mysql</groupId>
|
||
<artifactId>mysql-connector-java</artifactId>
|
||
<scope>runtime</scope>
|
||
</dependency>
|
||
<!--mybatis依赖 -->
|
||
<dependency>
|
||
<groupId>org.mybatis.spring.boot</groupId>
|
||
<artifactId>mybatis-spring-boot-starter</artifactId>
|
||
<version>1.3.2</version>
|
||
</dependency>
|
||
<!--alibaba连接池依赖-->
|
||
<dependency>
|
||
<groupId>com.alibaba</groupId>
|
||
<artifactId>druid-spring-boot-starter</artifactId>
|
||
<version>1.1.9</version>
|
||
</dependency>
|
||
<!--分页依赖-->
|
||
<dependency>
|
||
<groupId>com.github.pagehelper</groupId>
|
||
<artifactId>pagehelper-spring-boot-starter</artifactId>
|
||
<version>1.2.5</version>
|
||
</dependency>
|
||
<dependency>
|
||
<groupId>org.springframework.boot</groupId>
|
||
<artifactId>spring-boot-starter-test</artifactId>
|
||
<scope>test</scope>
|
||
</dependency>
|
||
</dependencies>
|
||
|
||
<build>
|
||
<plugins>
|
||
<plugin>
|
||
<groupId>org.springframework.boot</groupId>
|
||
<artifactId>spring-boot-maven-plugin</artifactId>
|
||
</plugin>
|
||
</plugins>
|
||
</build>
|
||
</project>
|
||
```
|
||
|
||
## 1.创建项目
|
||
|
||
使用 idea 中的 spring initializr 生成 maven 项目,项目命令为 mybatis-test,选择 web,mysql,mybatis 依赖,即可成功。(详细过程不赘述,如有需要学习 springboot 创建过程,可参考[这篇文章](https://blog.fleyx.com/blog/detail/2018-08-13-10-38)。
|
||
|
||
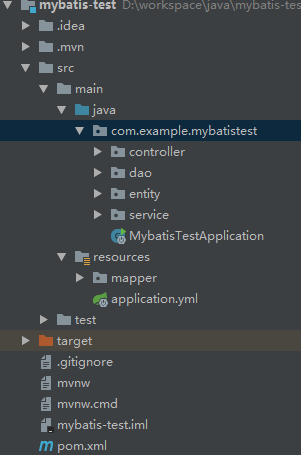
然后依照上面的 pom 文件,补齐缺少的依赖。接着创建包 entity,service 和 mybatis 映射文件夹 mapper,创建。为了方便配置将 application.properties 改成 application.yml。由于我们时 REST 接口,故不需要 static 和 templates 目录。修改完毕后的项目结构如下:
|
||
|
||
|
||
|
||
  修改启动类,增加`@MapperScan("com.example.mybatistest.dao")`,以自动扫描 dao 目录,避免每个 dao 都手动加`@Mapper`注解。代码如下:
|
||
|
||
```java
|
||
@SpringBootApplication
|
||
@MapperScan("com.example.mybatistest.dao")
|
||
public class MybatisTestApplication {
|
||
public static void main(String[] args) {
|
||
SpringApplication.run(MybatisTestApplication.class, args);
|
||
}
|
||
}
|
||
```
|
||
|
||
修改 application.yml,配置项目,代码如下:
|
||
|
||
```yml
|
||
mybatis:
|
||
#对应实体类路径
|
||
type-aliases-package: com.example.mybatistest.entity
|
||
#对应mapper映射文件路径
|
||
mapper-locations: classpath:mapper/*.xml
|
||
|
||
#pagehelper物理分页配置
|
||
pagehelper:
|
||
helper-dialect: mysql
|
||
reasonable: true
|
||
support-methods-arguments: true
|
||
params: count=countSql
|
||
returnPageInfo: check
|
||
|
||
server:
|
||
port: 8081
|
||
|
||
spring:
|
||
datasource:
|
||
name: mysqlTest
|
||
type: com.alibaba.druid.pool.DruidDataSource
|
||
#druid连接池相关配置
|
||
druid:
|
||
#监控拦截统计的filters
|
||
filters: stat
|
||
driver-class-name: com.mysql.jdbc.Driver
|
||
url: jdbc:mysql://localhost:3306/test?useUnicode=true&characterEncoding=utf-8&useSSL=true
|
||
username: root
|
||
password: 123456
|
||
#配置初始化大小,最小,最大
|
||
initial-size: 1
|
||
min-idle: 1
|
||
max-active: 20
|
||
#获取连接等待超时时间
|
||
max-wait: 6000
|
||
#间隔多久检测一次需要关闭的空闲连接
|
||
time-between-eviction-runs-millis: 60000
|
||
#一个连接在池中的最小生存时间
|
||
min-evictable-idle-time-millis: 300000
|
||
#打开PSCache,并指定每个连接上PSCache的大小。oracle设置为true,mysql设置为false。分库分表设置较多推荐设置
|
||
pool-prepared-statements: false
|
||
max-pool-prepared-statement-per-connection-size: 20
|
||
http:
|
||
encoding:
|
||
charset: utf-8
|
||
enabled: true
|
||
```
|
||
|
||
## 2.编写代码
|
||
|
||
首先创建数据表,sql 语句如下:
|
||
|
||
```sql
|
||
CREATE TABLE `user` (
|
||
`id` int(11) NOT NULL AUTO_INCREMENT,
|
||
`name` varchar(255) NOT NULL,
|
||
`age` tinyint(4) NOT NULL DEFAULT '0',
|
||
`password` varchar(255) NOT NULL DEFAULT '123456',
|
||
PRIMARY KEY (`id`)
|
||
) ENGINE=InnoDB AUTO_INCREMENT=0 DEFAULT CHARSET=utf8;
|
||
```
|
||
|
||
然后在 entity 包中创建实体类 User.java
|
||
|
||
```java
|
||
public class User {
|
||
private int id;
|
||
private String name;
|
||
private int age;
|
||
private String password;
|
||
|
||
public User(int id, String name, int age, String password) {
|
||
this.id = id;
|
||
this.name = name;
|
||
this.age = age;
|
||
this.password = password;
|
||
}
|
||
public User(){}
|
||
//getter setter自行添加
|
||
}
|
||
```
|
||
|
||
在 dao 包下创建 UserDao.java
|
||
|
||
```java
|
||
public interface UserDao {
|
||
//插入用户
|
||
int insert(User user);
|
||
//根据id查询
|
||
User selectById(String id);
|
||
//查询所有
|
||
List<User> selectAll();
|
||
}
|
||
```
|
||
|
||
在 mapper 文件夹下创建 UserMapper.xml,具体的 xml 编写方法查看文首的官方文档。
|
||
|
||
```xml
|
||
<?xml version="1.0" encoding="utf-8" ?>
|
||
<!DOCTYPE mapper PUBLIC "-//mybatis.org//DTD Mapper 3.0//EN" "http://mybatis.org/dtd/mybatis-3-mapper.dtd" >
|
||
<mapper namespace="com.example.mybatistest.dao.UserDao">
|
||
<sql id="BASE_TABLE">
|
||
user
|
||
</sql>
|
||
<sql id="BASE_COLUMN">
|
||
id,name,age,password
|
||
</sql>
|
||
|
||
<insert id="insert" parameterType="com.example.mybatistest.entity.User" useGeneratedKeys="true" keyProperty="id">
|
||
INSERT INTO <include refid="BASE_TABLE"/>
|
||
<trim prefix="(" suffix=")" suffixOverrides=",">
|
||
name,password,
|
||
<if test="age!=null">
|
||
age
|
||
</if>
|
||
</trim>
|
||
<trim prefix=" VALUE(" suffix=")" suffixOverrides=",">
|
||
#{name,jdbcType=VARCHAR},#{password},
|
||
<if test="age!=null">
|
||
#{age}
|
||
</if>
|
||
</trim>
|
||
</insert>
|
||
|
||
<select id="selectById" resultType="com.example.mybatistest.entity.User">
|
||
select
|
||
<include refid="BASE_COLUMN"/>
|
||
from
|
||
<include refid="BASE_TABLE"/>
|
||
where id=#{id}
|
||
</select>
|
||
|
||
<select id="selectAll" resultType="com.example.mybatistest.entity.User">
|
||
select
|
||
<include refid="BASE_COLUMN"/>
|
||
from
|
||
<include refid="BASE_TABLE"/>
|
||
</select>
|
||
</mapper>
|
||
```
|
||
|
||
至此使用 mybatis 的代码编写完了,之后要用时调用 dao 接口中的方法即可。
|
||
|
||
## 3.测试
|
||
|
||
我们通过编写 service,controller 然后使用 postman 进行测试。
|
||
|
||
首先编写 UserService.java,代码如下:
|
||
|
||
```java
|
||
@Component
|
||
public class UserService {
|
||
|
||
@Autowired
|
||
private UserDao userDao;
|
||
|
||
public User getByUserId(String id){
|
||
return userDao.selectById(id);
|
||
}
|
||
//获取全部用户
|
||
public List<User> getAll(){
|
||
return userDao.selectAll();
|
||
}
|
||
//测试分页
|
||
public PageInfo<User> getAll(int pageNum,int pageSize){
|
||
PageHelper.startPage(pageNum,pageSize);
|
||
List<User> users = userDao.selectAll();
|
||
System.out.println(users.size());
|
||
PageInfo<User> result = new PageInfo<>(users);
|
||
return result;
|
||
}
|
||
|
||
public int insert(User user){
|
||
return userDao.insert(user);
|
||
}
|
||
|
||
}
|
||
```
|
||
|
||
编写 UserController.java
|
||
|
||
```java
|
||
@RestController
|
||
public class UserController {
|
||
|
||
@Autowired
|
||
private UserService userService;
|
||
|
||
@GetMapping("/user/{userId}")
|
||
public User getUser(@PathVariable String userId){
|
||
return userService.getByUserId(userId);
|
||
}
|
||
|
||
@GetMapping("/user")
|
||
public List<User> getAll(){
|
||
return userService.getAll();
|
||
}
|
||
|
||
@GetMapping("/user/page/{pageNum}")
|
||
public Object getPage(@PathVariable int pageNum,
|
||
@RequestParam(name = "pageSize",required = false,defaultValue = "10") int pageSize){
|
||
return userService.getAll(pageNum,pageSize);
|
||
}
|
||
|
||
@PostMapping("/user")
|
||
public Object addOne(User user){
|
||
userService.insert(user);
|
||
return user;
|
||
}
|
||
}
|
||
```
|
||
|
||
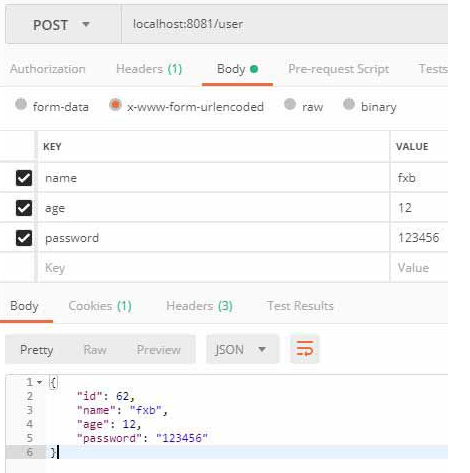
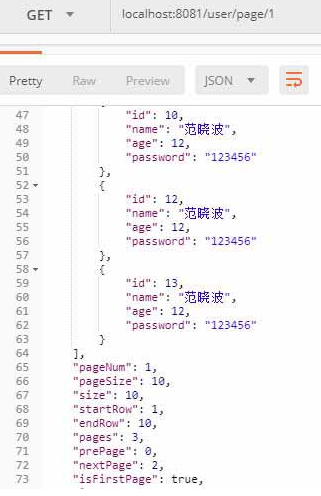
启动项目,通过 postman 进行请求测试,测试结果如下:
|
||
|
||
- 插入数据:
|
||
|
||
|
||
|
||
- 查询数据
|
||
|
||

|
||
|
||
- 分页查询
|
||
|
||
|
||
|
||
## 4.注解编写 sql
|
||
|
||
上面使用的是 xml 方式编写 sql 代码,其实 mybatis 也支持在注解中编写 sql,这样可以避免编写复杂的 xml 查询文件,但同时也将 sql 语句耦合到了代码中,也不易实现复杂查询,因此多用于简单 sql 语句的编写。
|
||
|
||
要使用注解首先将 applicaton.yml 配置文件中的`mapper-locations: classpath:mapper/*.xml`注释掉。然后在 UserDao.java 中加入 sql 注解,代码如下:
|
||
|
||
```java
|
||
public interface UserDao {
|
||
//插入用户
|
||
@Insert("insert into user(name,age,password) value(#{name},#{age},#{password})")
|
||
@Options(useGeneratedKeys=true,keyColumn="id",keyProperty="id")
|
||
int insert(User user);
|
||
//根据id查询
|
||
@Select("select * from user where id=#{id}")
|
||
User selectById(String id);
|
||
//查询所有
|
||
@Select("select * from user")
|
||
List<User> selectAll();
|
||
}
|
||
```
|
||
|
||
然后重新启动项目测试,测试结果跟上面完全一样。
|
||
|
||
**源码地址:**[https://github.com/FleyX/demo-project/tree/master/mybatis-test](https://github.com/FleyX/demo-project/tree/master/mybatis-test).
|