324 lines
13 KiB
Markdown
324 lines
13 KiB
Markdown
---
|
||
id: "2018-09-10-10-38"
|
||
date: "2018/09/10 10:38:00"
|
||
title: "springboot配置读写分离(Mybatis)"
|
||
tags: ["java", "spring","springboot","mysql","主从备份","读写分离"]
|
||
categories:
|
||
- "java"
|
||
- "spring boot学习"
|
||
---
|
||
|
||
  近日工作任务较轻,有空学习学习技术,遂来研究如果实现读写分离。这里用博客记录下过程,一方面可备日后查看,同时也能分享给大家(网上的资料真的大都是抄来抄去,,还不带格式的,看的真心难受)。
|
||
|
||
[完整代码](https://github.com/FleyX/demo-project/tree/master/dxfl)
|
||
|
||
## 1、背景
|
||
|
||
  一个项目中数据库最基础同时也是最主流的是单机数据库,读写都在一个库中。当用户逐渐增多,单机数据库无法满足性能要求时,就会进行读写分离改造(适用于读多写少),写操作一个库,读操作多个库,通常会做一个数据库集群,开启主从备份,一主多从,以提高读取性能。当用户更多读写分离也无法满足时,就需要分布式数据库了(可能以后会学习怎么弄)。
|
||
|
||
  正常情况下读写分离的实现,首先要做一个一主多从的数据库集群,同时还需要进行数据同步。这一篇记录如何用 mysql 搭建一个一主多次的配置,下一篇记录代码层面如何实现读写分离。
|
||
|
||
## 2、搭建一主多从数据库集群
|
||
|
||
  主从备份需要多台虚拟机,我是用 wmware 完整克隆多个实例,注意直接克隆的虚拟机会导致每个数据库的 uuid 相同,需要修改为不同的 uuid。修改方法参考这个:[点击跳转](https://blog.csdn.net/pratise/article/details/80413198)。
|
||
|
||
- 主库配置
|
||
|
||
主数据库(master)中新建一个用户用于从数据库(slave)读取主数据库二进制日志,sql 语句如下:
|
||
|
||
```sql
|
||
mysql> CREATE USER 'repl'@'%' IDENTIFIED BY '123456';#创建用户
|
||
mysql> GRANT REPLICATION SLAVE ON *.* TO 'repl'@'%';#分配权限
|
||
mysql>flush privileges; #刷新权限
|
||
```
|
||
|
||
同时修改 mysql 配置文件开启二进制日志,新增部分如下:
|
||
|
||
```sql
|
||
[mysqld]
|
||
server-id=1
|
||
log-bin=master-bin
|
||
log-bin-index=master-bin.index
|
||
```
|
||
|
||
然后重启数据库,使用`show master status;`语句查看主库状态,如下所示:
|
||
|
||

|
||
|
||
<!-- more -->
|
||
|
||
- 从库配置
|
||
|
||
同样先新增几行配置:
|
||
|
||
```sql
|
||
[mysqld]
|
||
server-id=2
|
||
relay-log-index=slave-relay-bin.index
|
||
relay-log=slave-relay-bin
|
||
```
|
||
|
||
然后重启数据库,使用如下语句连接主库:
|
||
|
||
```sql
|
||
CHANGE MASTER TO
|
||
MASTER_HOST='192.168.226.5',
|
||
MASTER_USER='root',
|
||
MASTER_PASSWORD='123456',
|
||
MASTER_LOG_FILE='master-bin.000003',
|
||
MASTER_LOG_POS=154;
|
||
```
|
||
|
||
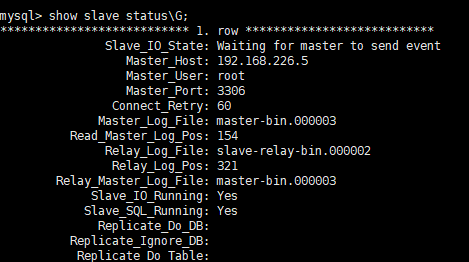
接着运行`start slave;`开启备份,正常情况如下图所示:Slave_IO_Running 和 Slave_SQL_Running 都为 yes。
|
||
|
||
|
||
|
||
可以用这个步骤开启多个从库。
|
||
|
||
  默认情况下备份是主库的全部操作都会备份到从库,实际可能需要忽略某些库,可以在主库中增加如下配置:
|
||
|
||
```sql
|
||
# 不同步哪些数据库
|
||
binlog-ignore-db = mysql
|
||
binlog-ignore-db = test
|
||
binlog-ignore-db = information_schema
|
||
|
||
# 只同步哪些数据库,除此之外,其他不同步
|
||
binlog-do-db = game
|
||
```
|
||
|
||
## 3、代码层面进行读写分离
|
||
|
||
  代码环境是 springboot+mybatis+druib 连接池。想要读写分离就需要配置多个数据源,在进行写操作是选择写的数据源,读操作时选择读的数据源。其中有两个关键点:
|
||
|
||
- 如何切换数据源
|
||
- 如何根据不同的方法选择正确的数据源
|
||
|
||
### 1)、如何切换数据源
|
||
|
||
  通常用 springboot 时都是使用它的默认配置,只需要在配置文件中定义好连接属性就行了,但是现在我们需要自己来配置了,spring 是支持多数据源的,多个 datasource 放在一个 HashMap`TargetDataSource`中,通过`dertermineCurrentLookupKey`获取 key 来觉定要使用哪个数据源。因此我们的目标就很明确了,建立多个 datasource 放到 TargetDataSource 中,同时重写 dertermineCurrentLookupKey 方法来决定使用哪个 key。
|
||
|
||
### 2)、如何选择数据源
|
||
|
||
  事务一般是注解在 Service 层的,因此在开始这个 service 方法调用时要确定数据源,有什么通用方法能够在开始执行一个方法前做操作呢?相信你已经想到了那就是**切面 **。怎么切有两种办法:
|
||
|
||
- 注解式,定义一个只读注解,被该数据标注的方法使用读库
|
||
- 方法名,根据方法名写切点,比如 getXXX 用读库,setXXX 用写库
|
||
|
||
### 3)、代码编写
|
||
|
||
#### a、编写配置文件,配置两个数据源信息
|
||
|
||
  只有必填信息,其他都有默认设置
|
||
|
||
```yml
|
||
mysql:
|
||
datasource:
|
||
#读库数目
|
||
num: 1
|
||
type-aliases-package: com.example.dxfl.dao
|
||
mapper-locations: classpath:/mapper/*.xml
|
||
config-location: classpath:/mybatis-config.xml
|
||
write:
|
||
url: jdbc:mysql://192.168.226.5:3306/test?useUnicode=true&characterEncoding=utf-8&useSSL=true
|
||
username: root
|
||
password: 123456
|
||
driver-class-name: com.mysql.jdbc.Driver
|
||
read:
|
||
url: jdbc:mysql://192.168.226.6:3306/test?useUnicode=true&characterEncoding=utf-8&useSSL=true
|
||
username: root
|
||
password: 123456
|
||
driver-class-name: com.mysql.jdbc.Driver
|
||
```
|
||
|
||
#### b、编写 DbContextHolder 类
|
||
|
||
  这个类用来设置数据库类别,其中有一个 ThreadLocal 用来保存每个线程的是使用读库,还是写库。代码如下:
|
||
|
||
```java
|
||
/**
|
||
* Description 这里切换读/写模式
|
||
* 原理是利用ThreadLocal保存当前线程是否处于读模式(通过开始READ_ONLY注解在开始操作前设置模式为读模式,
|
||
* 操作结束后清除该数据,避免内存泄漏,同时也为了后续在该线程进行写操作时任然为读模式
|
||
* @author fxb
|
||
* @date 2018-08-31
|
||
*/
|
||
public class DbContextHolder {
|
||
|
||
private static Logger log = LoggerFactory.getLogger(DbContextHolder.class);
|
||
public static final String WRITE = "write";
|
||
public static final String READ = "read";
|
||
|
||
private static ThreadLocal<String> contextHolder= new ThreadLocal<>();
|
||
|
||
public static void setDbType(String dbType) {
|
||
if (dbType == null) {
|
||
log.error("dbType为空");
|
||
throw new NullPointerException();
|
||
}
|
||
log.info("设置dbType为:{}",dbType);
|
||
contextHolder.set(dbType);
|
||
}
|
||
|
||
public static String getDbType() {
|
||
return contextHolder.get() == null ? WRITE : contextHolder.get();
|
||
}
|
||
|
||
public static void clearDbType() {
|
||
contextHolder.remove();
|
||
}
|
||
}
|
||
```
|
||
|
||
#### c、重写 determineCurrentLookupKey 方法
|
||
|
||
  spring 在开始进行数据库操作时会通过这个方法来决定使用哪个数据库,因此我们在这里调用上面 DbContextHolder 类的`getDbType()`方法获取当前操作类别,同时可进行读库的负载均衡,代码如下:
|
||
|
||
```java
|
||
public class MyAbstractRoutingDataSource extends AbstractRoutingDataSource {
|
||
|
||
@Value("${mysql.datasource.num}")
|
||
private int num;
|
||
|
||
private final Logger log = LoggerFactory.getLogger(this.getClass());
|
||
|
||
@Override
|
||
protected Object determineCurrentLookupKey() {
|
||
String typeKey = DbContextHolder.getDbType();
|
||
if (typeKey == DbContextHolder.WRITE) {
|
||
log.info("使用了写库");
|
||
return typeKey;
|
||
}
|
||
//使用随机数决定使用哪个读库
|
||
int sum = NumberUtil.getRandom(1, num);
|
||
log.info("使用了读库{}", sum);
|
||
return DbContextHolder.READ + sum;
|
||
}
|
||
}
|
||
```
|
||
|
||
#### d、编写配置类
|
||
|
||
  由于要进行读写分离,不能再用 springboot 的默认配置,我们需要手动来进行配置。首先生成数据源,使用@ConfigurProperties 自动生成数据源:
|
||
|
||
```java
|
||
/**
|
||
* 写数据源
|
||
*
|
||
* @Primary 标志这个 Bean 如果在多个同类 Bean 候选时,该 Bean 优先被考虑。
|
||
* 多数据源配置的时候注意,必须要有一个主数据源,用 @Primary 标志该 Bean
|
||
*/
|
||
@Primary
|
||
@Bean
|
||
@ConfigurationProperties(prefix = "mysql.datasource.write")
|
||
public DataSource writeDataSource() {
|
||
return new DruidDataSource();
|
||
}
|
||
```
|
||
|
||
读数据源类似,注意有多少个读库就要设置多少个读数据源,Bean 名为 read+序号。
|
||
|
||
  然后设置数据源,使用的是我们之前写的 MyAbstractRoutingDataSource 类
|
||
|
||
```java
|
||
/**
|
||
* 设置数据源路由,通过该类中的determineCurrentLookupKey决定使用哪个数据源
|
||
*/
|
||
@Bean
|
||
public AbstractRoutingDataSource routingDataSource() {
|
||
MyAbstractRoutingDataSource proxy = new MyAbstractRoutingDataSource();
|
||
Map<Object, Object> targetDataSources = new HashMap<>(2);
|
||
targetDataSources.put(DbContextHolder.WRITE, writeDataSource());
|
||
targetDataSources.put(DbContextHolder.READ+"1", read1());
|
||
proxy.setDefaultTargetDataSource(writeDataSource());
|
||
proxy.setTargetDataSources(targetDataSources);
|
||
return proxy;
|
||
}
|
||
```
|
||
|
||
  接着需要设置 sqlSessionFactory
|
||
|
||
```java
|
||
/**
|
||
* 多数据源需要自己设置sqlSessionFactory
|
||
*/
|
||
@Bean
|
||
public SqlSessionFactory sqlSessionFactory() throws Exception {
|
||
SqlSessionFactoryBean bean = new SqlSessionFactoryBean();
|
||
bean.setDataSource(routingDataSource());
|
||
ResourcePatternResolver resolver = new PathMatchingResourcePatternResolver();
|
||
// 实体类对应的位置
|
||
bean.setTypeAliasesPackage(typeAliasesPackage);
|
||
// mybatis的XML的配置
|
||
bean.setMapperLocations(resolver.getResources(mapperLocation));
|
||
bean.setConfigLocation(resolver.getResource(configLocation));
|
||
return bean.getObject();
|
||
}
|
||
```
|
||
|
||
  最后还得配置下事务,否则事务不生效
|
||
|
||
```java
|
||
/**
|
||
* 设置事务,事务需要知道当前使用的是哪个数据源才能进行事务处理
|
||
*/
|
||
@Bean
|
||
public DataSourceTransactionManager dataSourceTransactionManager() {
|
||
return new DataSourceTransactionManager(routingDataSource());
|
||
}
|
||
```
|
||
|
||
### 4)、选择数据源
|
||
|
||
  多数据源配置好了,但是代码层面如何选择选择数据源呢?这里介绍两种办法:
|
||
|
||
#### a、注解式
|
||
|
||
  首先定义一个只读注解,被这个注解方法使用读库,其他使用写库,如果项目是中途改造成读写分离可使用这个方法,无需修改业务代码,只要在只读的 service 方法上加一个注解即可。
|
||
|
||
```java
|
||
@Target({ElementType.METHOD,ElementType.TYPE})
|
||
@Retention(RetentionPolicy.RUNTIME)
|
||
public @interface ReadOnly {
|
||
}
|
||
```
|
||
|
||
  然后写一个切面来切换数据使用哪种数据源,重写 getOrder 保证本切面优先级高于事务切面优先级,在启动类加上`@EnableTransactionManagement(order = 10)`,为了代码如下:
|
||
|
||
```java
|
||
@Aspect
|
||
@Component
|
||
public class ReadOnlyInterceptor implements Ordered {
|
||
private static final Logger log= LoggerFactory.getLogger(ReadOnlyInterceptor.class);
|
||
|
||
@Around("@annotation(readOnly)")
|
||
public Object setRead(ProceedingJoinPoint joinPoint,ReadOnly readOnly) throws Throwable{
|
||
try{
|
||
DbContextHolder.setDbType(DbContextHolder.READ);
|
||
return joinPoint.proceed();
|
||
}finally {
|
||
//清楚DbType一方面为了避免内存泄漏,更重要的是避免对后续在本线程上执行的操作产生影响
|
||
DbContextHolder.clearDbType();
|
||
log.info("清除threadLocal");
|
||
}
|
||
}
|
||
|
||
@Override
|
||
public int getOrder() {
|
||
return 0;
|
||
}
|
||
}
|
||
```
|
||
|
||
#### b、方法名式
|
||
|
||
  这种方法不许要注解,但是需要事务名称按一定规则编写,然后通过切面来设置数据库类别,比如`setXXX`设置为写、`getXXX`设置为读,代码我就不写了,应该都知道怎么写。
|
||
|
||
## 4、测试
|
||
|
||
  编写好代码来试试结果如何,下面是运行截图:
|
||
|
||

|
||
|
||
  断断续续写了好几天终于是写完了,,,如果有帮助到你,,欢迎 star 哦,,这里是完整代码地址:[点击跳转](https://github.com/FleyX/demo-project/tree/master/dxfl)
|